
The trickiest thing about paella is the pan. I've gone through several paella pans, all cheaply made. Finally, I bought a 17" cast iron; it's business time.
The trickiest thing about paella is the pan. I've gone through several paella pans, all cheaply made. Finally, I bought a 17" cast iron; it's business time.
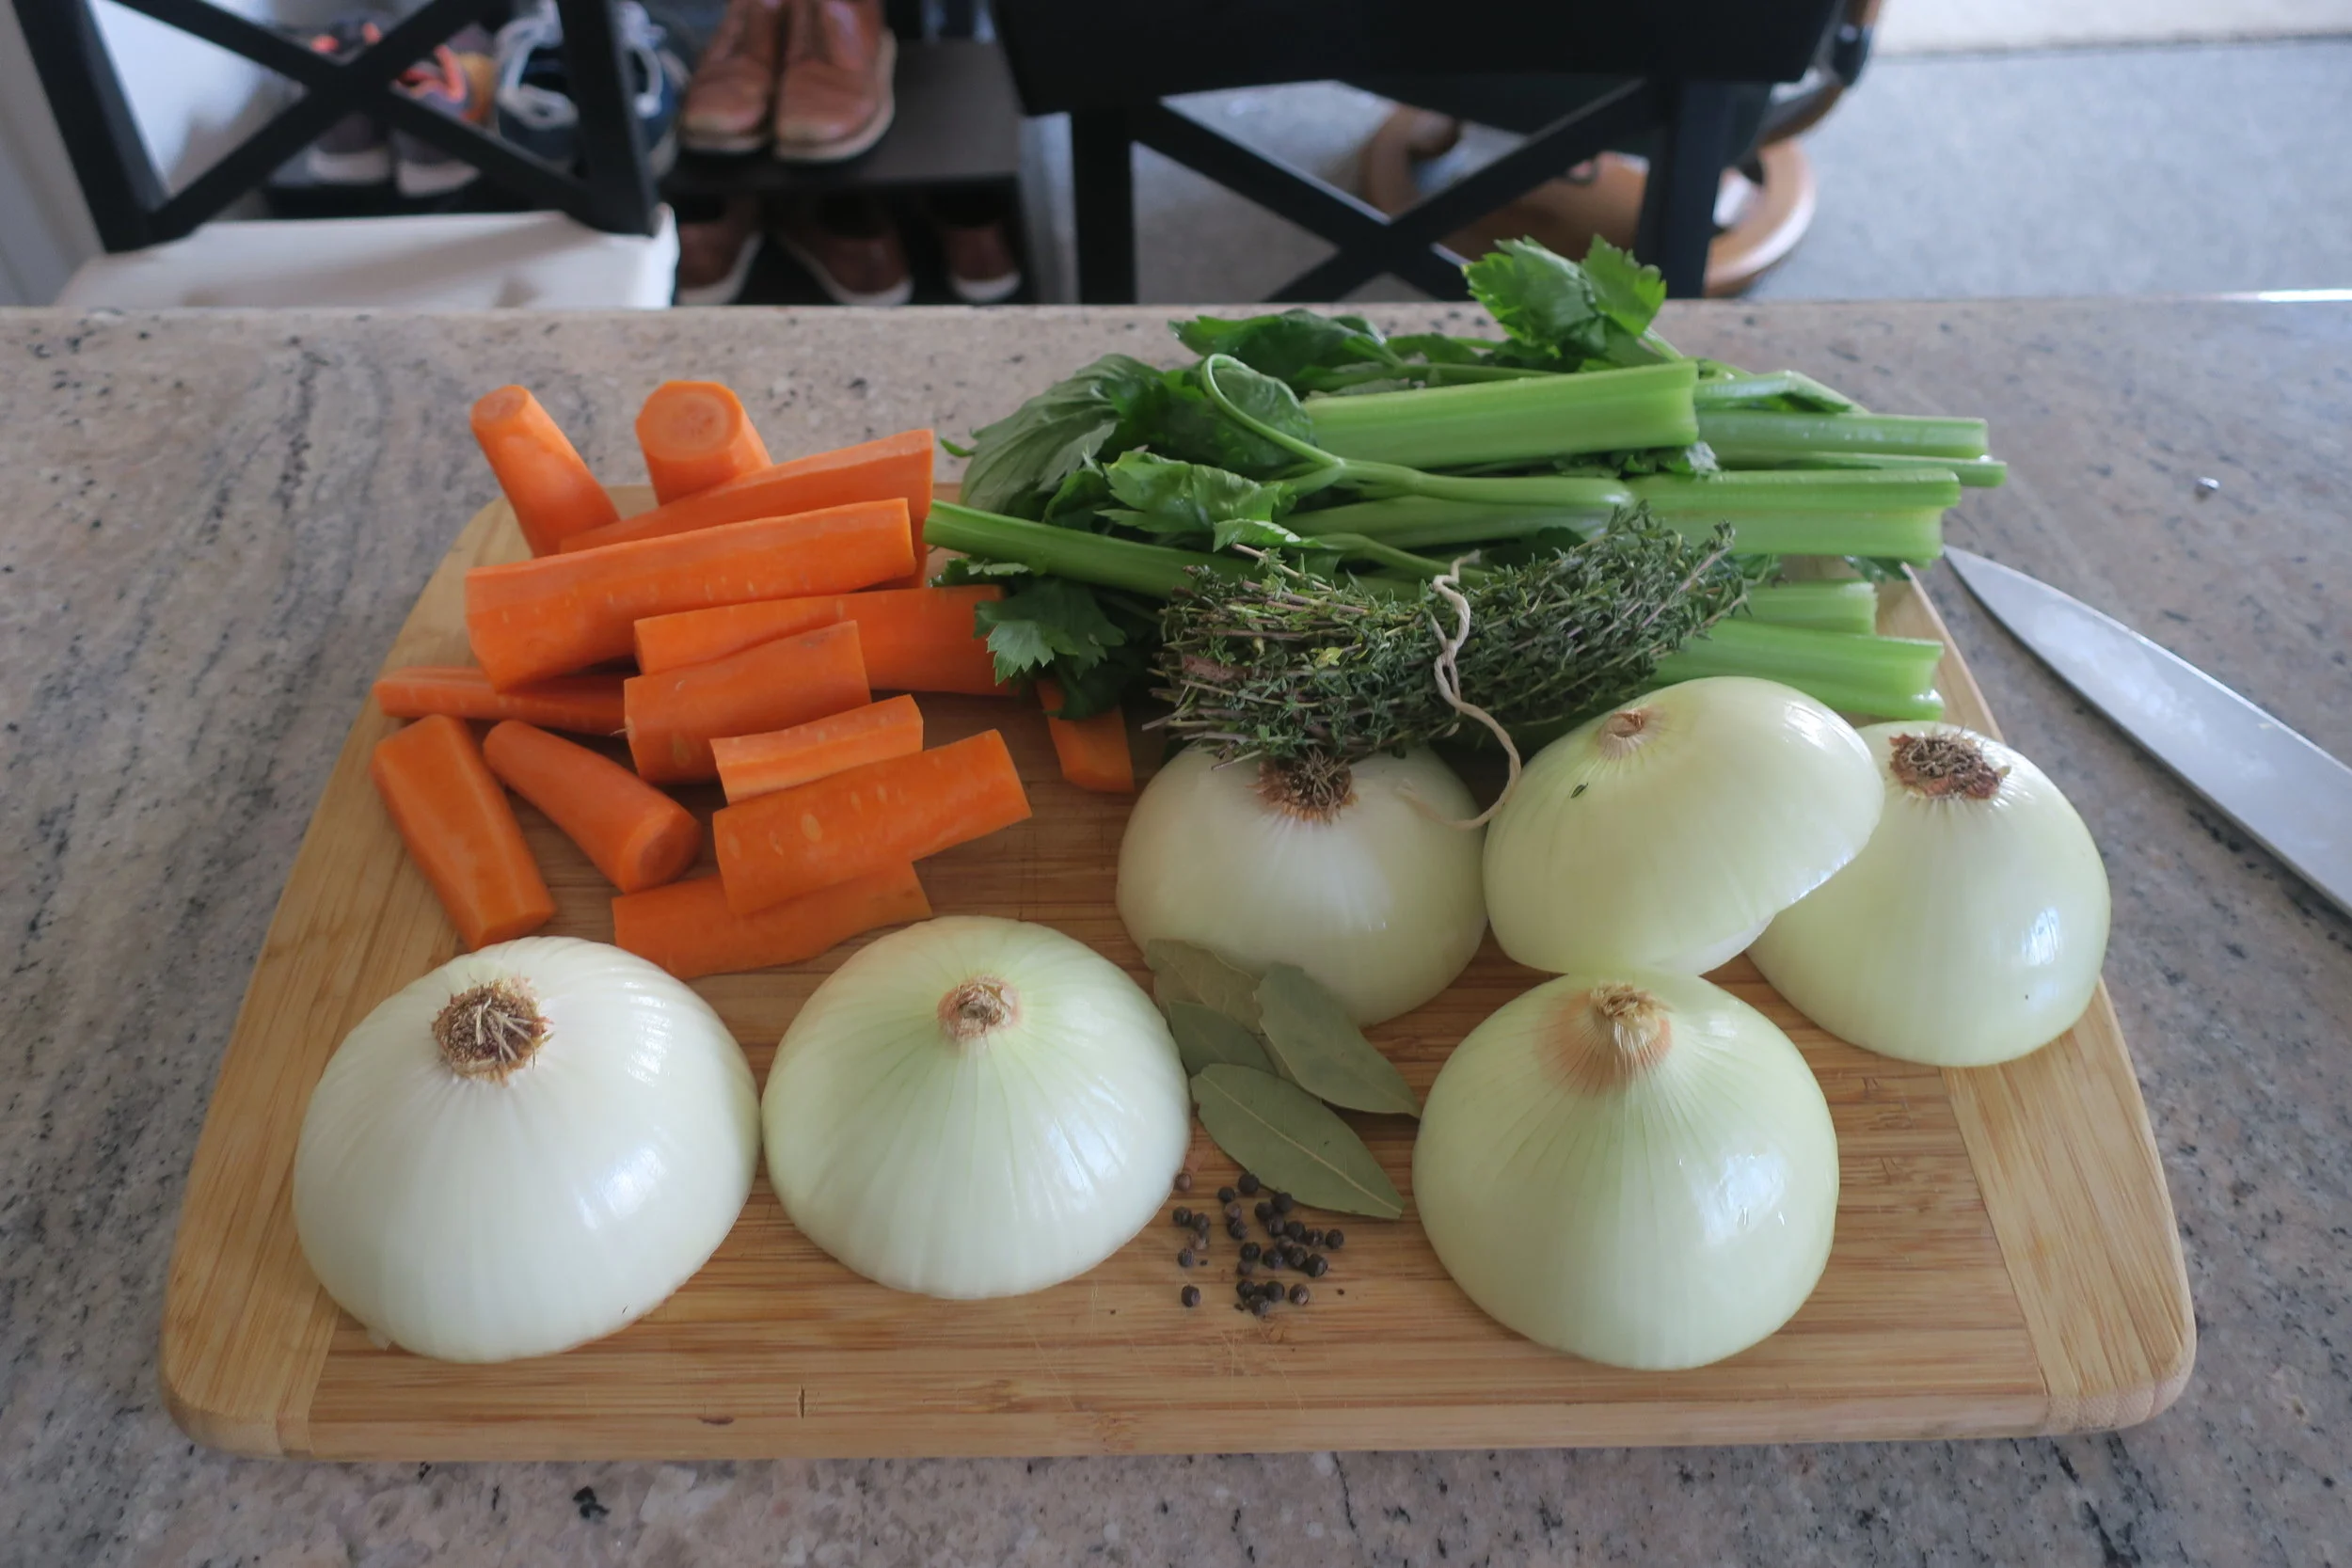
Want to make good soup? Make your own stock. The store bought stuff smells like dog food, and once you cook your own, you'll agree. So if you like soup, and you like being happy, listen up!

Broth is the base of soup, the better it is, the better the final product. Your homemade stock will taste so fresh and so clean, Outcast won't have nothing on it. Seriously. The difference is huge and you have no idea what you're missing!
There is no science to stock. I detest the taste of dill, I don't use it; my roommates love it, they do. However, and I know this might come as a shock, chicken is the most important ingredient, and I want to go over the various ways to get that most important flavor into your liquid gold.
1) Put the olive oil in the pan, turn the heat to medium, and brown them innards and uncooked chicken parts! Five minutes a side. Sprinkle a litter salt on those babies. Remember, browning is one of my rules, don't skimp. You're making chicken stock, let's make it taste like chicken, shall we.
2). Cut up your veggies. Don't cut anything too small! Bigger pieces are easier to remove at the end, and less work now. Hooray! For the celery, I like to use the leaves, but that's not usually an option. Unfortunate indeed, because they are full of flavor. Lastly, on those onions, I take off the paper but leave the hairs.

3). Veggies, into the pot, and stir. Despite my rules, you will not be browning these, just make them sweat a little. The goal is to start releasing their flavors.
4) Add the chicken bones when the veggies are fragrant,and stir. Some say break the bones to add flavor. I usually snap the whole body in half. I wouldn't advise taking a mallet to them because you'll have little bones in the pot, and all over your kitchen.
5) Add water. How much? I don't know. I just fill up the pot, one inch short of the top. Like I said, it's an art. If you have too much water and not enough flavor after seven hours later, cook it longer. The water will continue to evaporate, and you'll be left with stronger tasting stock. FYI, I'm using a four gallon pot.
6) Drop in the seasoning—thyme bundle, bay leaves, peppercorns and salt.
7) Bring to a boil, then let that baby simmer for 7 hours, stirring all along the way. Start tasting 4 hours in, keeping tabs on your flavors. Over this entire process, the water level will drop significantly; for me, usually by half. Some people say to skim the scum off the top. Nonsense. I just stir it back in. Later, when your stock cools, fat will rise and solidify on the surface—easily scooped, if you so desire.
8) The dismount; remove the pot from heat, and let it cool. I won't sugar coat it, this is a pain. Up until now you've put in minimal effort. Here's your problem—everyone's will be different, depending on your tools—get your stock into easily storable, freezable containers. You must strain out the solids, and some, like the thyme leaves, are small. For my method, I use a slotted spoon for the big pieces, pouring the remaining stock through a fine wire-mesh strainer, which I am constantly declogging, until finally, the business is done and my trash can is hot and steamy.
9) Freeze for up to 3 months, or refrigerate up to one week. I always bring my stock to a boil before using it, which is usually part of the next cooking process anyway. Great work, you won't be disappointed!

Liquid Gold
The stereotype out there is, that above all else, guys love steak. Well, I don't, and when my inner-carnivore comes out, I crave some bangin' fried chicken. So folks, put on some Marvin Gaye and let's getting cooking! The first ingredient in fried chicken is soul, and yes, I do have a special playlist for when I make this! :)
I've spent a lot time trying to crack this dish, one month, even making fried chicken every weekend. I learned a lot, and each variation gave me more and more valuable information. So leave your millennial-self at the door, and actually pay attention.
Skin It: Skin prevents the breading from sticking to the chicken, and even if you get it to stay, the breading can easily flop off while frying. Buy a whole bird, cut into pieces by the butcher, and skin the pieces before submerging in the buttermilk brine. I don't bother with the wings, FYI.
Brest off-the-bone: Take the breast off the bone! The ribs make it impossible to properly cook and fry.
The Bird: Whenever I cook, I use heritage breed chickens. Heritage just refers to animals that have bloodlines dating back centuries, rooted deeply in traditional farming. Associated with a specific breed name—sometimes displayed on the package—the meat is noticeably more delicious than the generic commercial breeds one finds on a typical supermarket self. Even organic chickens are genetically engineered to be larger, but this thickness comes at a price. Taste, sustainability, and in this case, ease of cooking.
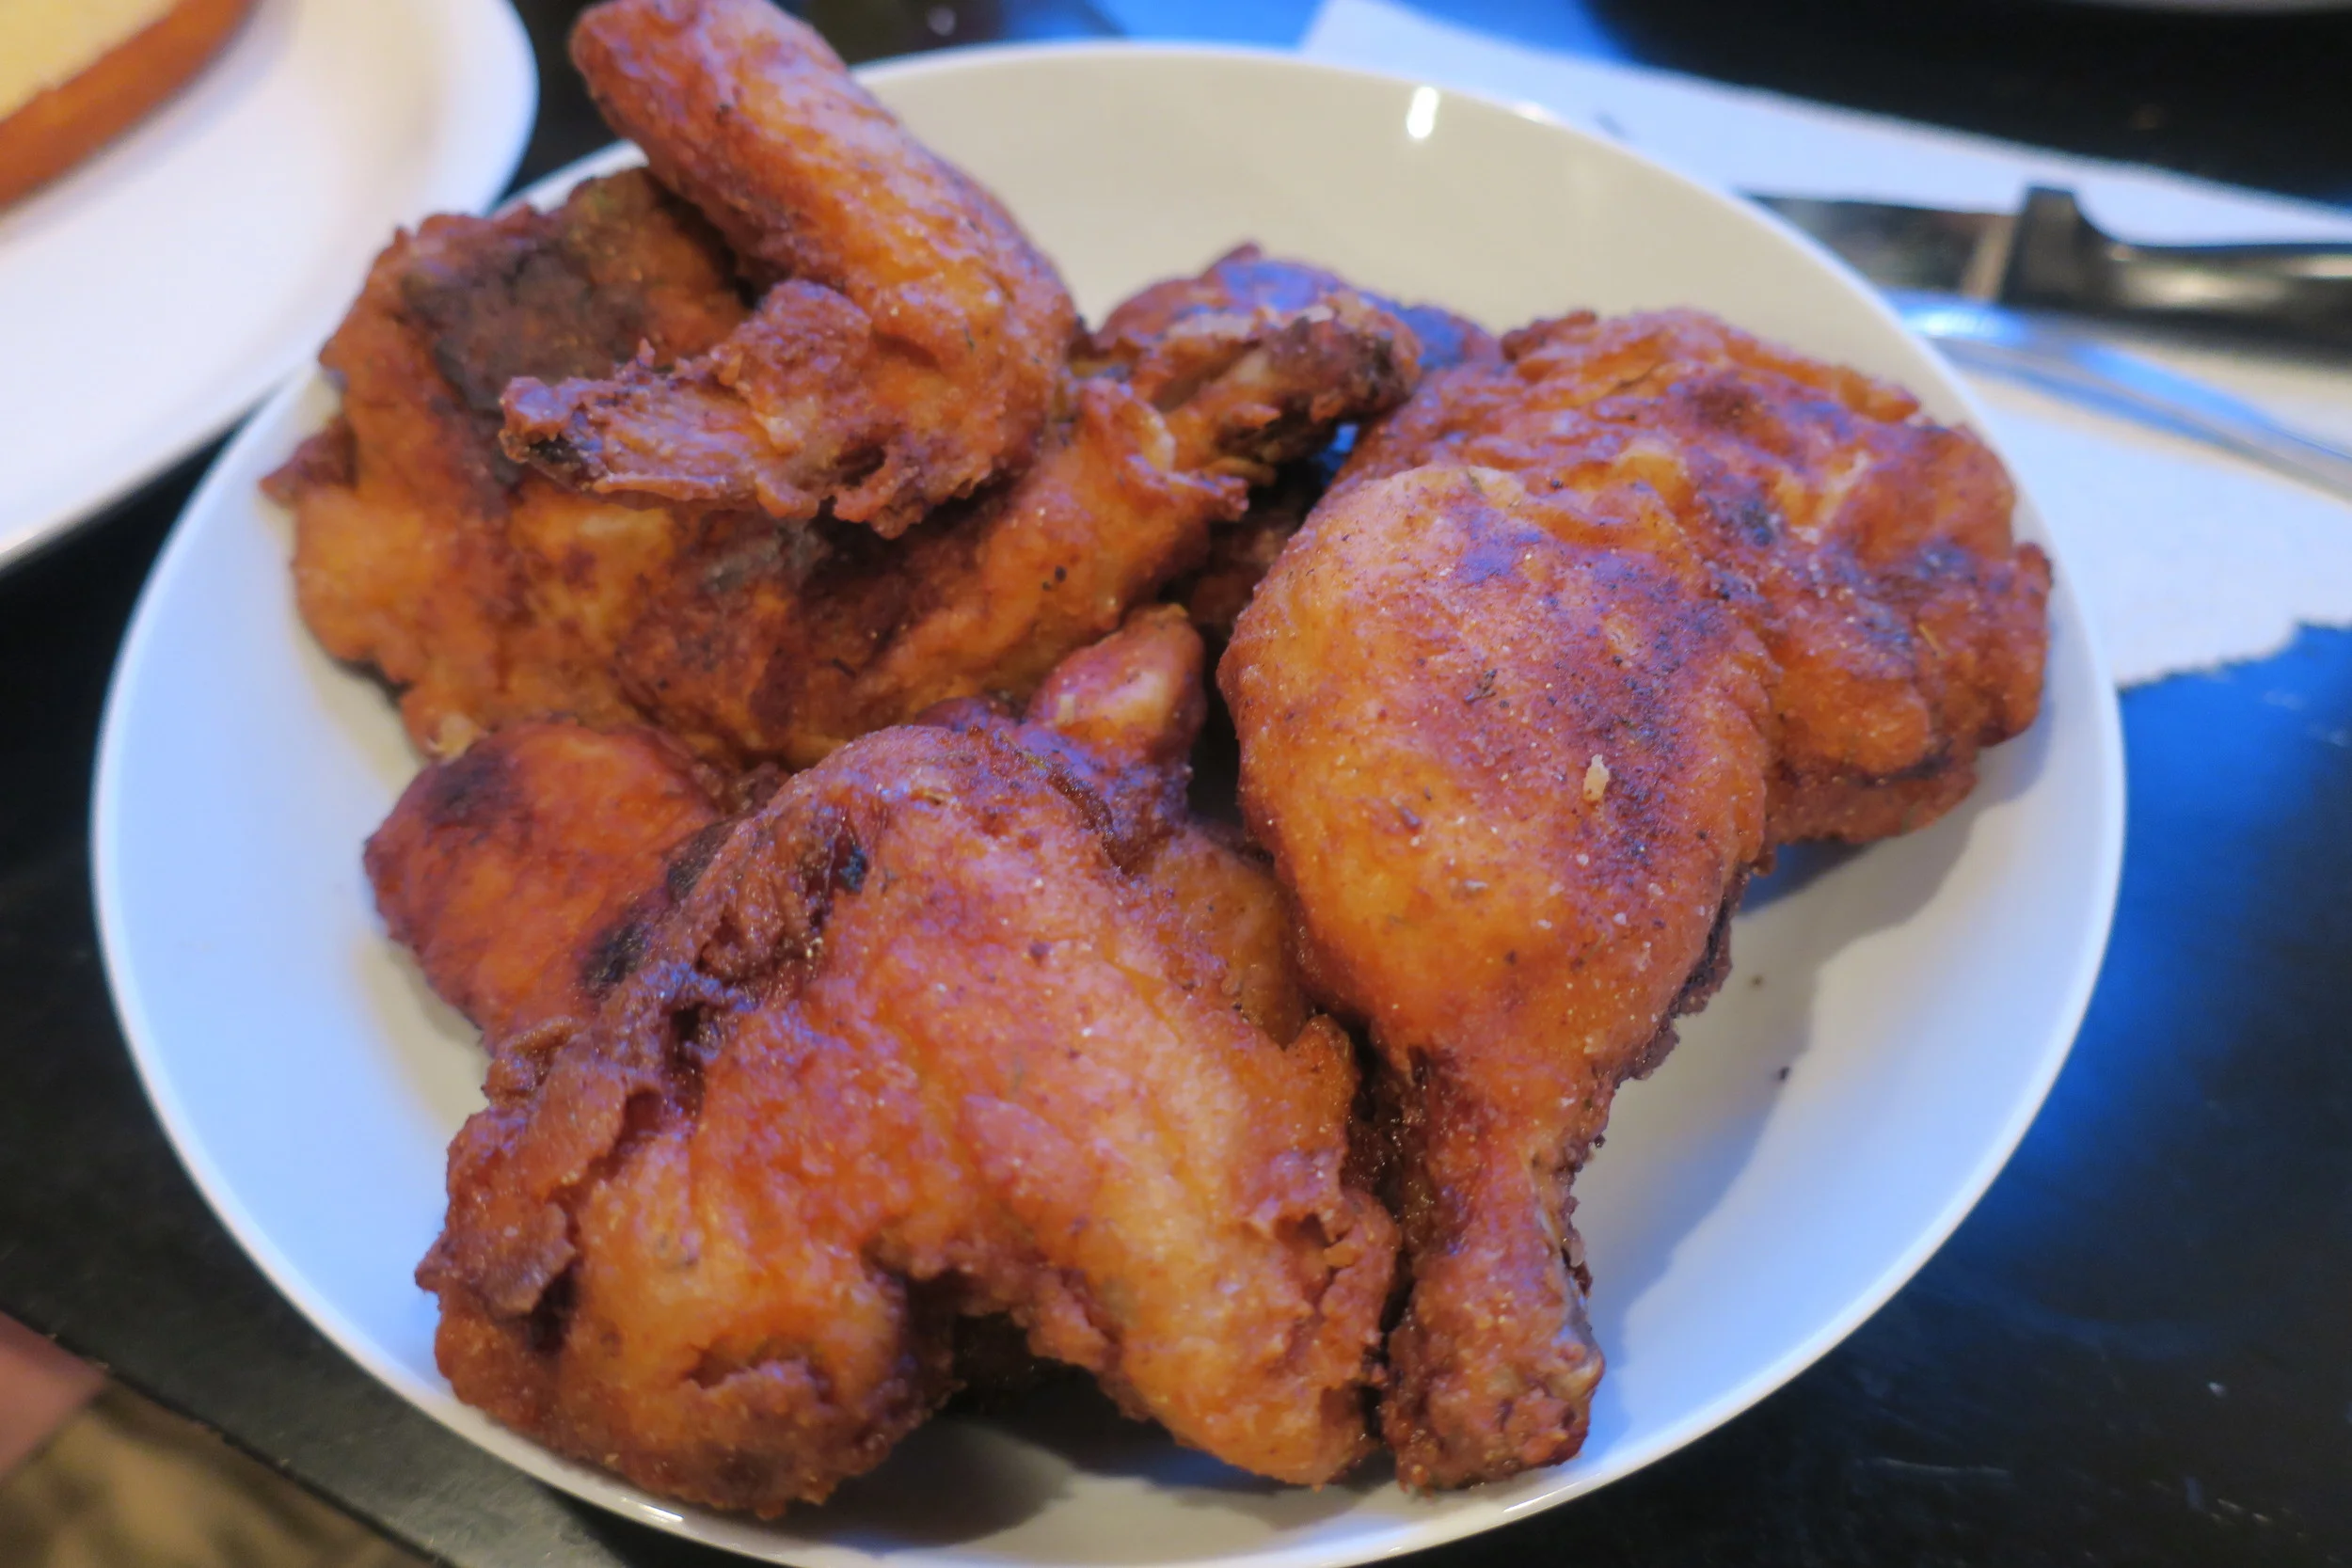
You fry at around 330°. Six minutes a side, no more. Depending on the size of the chicken piece, it might not actually be cooked through. If that's the case, you can't simply throw it back in the oil. You'll burn the fry, and to quote Octavia Spencer, "Minny don't burn chicken". So what do you do? Put it in the oven until it's done and if it's a big piece, that can take quite a while. Waiting for your fried chicken to cool down already sucks, adding extra oven time is just cruel.
Chicken and Waffles: When I make chicken and waffles, I only use breasts. Personal preference. Or, if I'm cooking for a large group, I'll buy just breasts, which means, I get stuck with those ungainly behemoths that the factory farming industry calls "chicken". I deal with the thickness by slicing them in half–length wise. One inch thick. No more, or things get complicated.
Combine on stove top:
1) Make the brine. Put a small pot on the stove, put everything in EXECPT the hot sauce, and turn on low heat. The idea here is to dissolve the honey, hence the heat; at the same time, not fill your kitchen with pepper spray, not adding the hot sauce. Stir the contents, and once the honey is dissolved, remove from heat. If you have a pot with a lid, get ready, if not maybe wait for it to cool a little. Put in the hot sauce, give a quick but good stir, and cover the pot. This prevents you from pepper spraying your kitchen. Let it cool.
2) De-skin your chicken! Today, I used a heritage chicken. It's a little smaller than a regular "broiler", FYI. I had the butcher cut it up–6-pieces, since it's real chicken sized–and take the breast off the bone; two breasts, two thighs/legs, and two wings. I took the skin off every piece but the wings. It's just a pain, and I never have problems with frying the wings.
3) Combine the brine and 1 quart of buttermilk in a gallon freezer bag. Mix it up, then add your chicken.
4) Chill. You, and the bird. I like waiting for 8 hours, but don't go more than 12. The lactic acid in the buttermilk is breaking down the protein in the chicken, aka tenderizing, but, there is such thing as too much of a good thing. Eventually things start to fall apart. So, no more than 12 hours. Place on a bowl to keep the bag upright and toss in the fridge. This is just to make sure it doesn't spill all over the place. No bueno.
5) Remove the bird from the fridge an hour before frying. Rinse off the chicken pieces and dry with paper towel. Remember, you are still dealing with raw chicken, so be vigilant about washing what it touches, including your hands. Place to the side, at room temperature. We want to bring the meat's internal temperature up so it cooks right.
6) Assemble your batter station! You need three bowls, and a place to put the chicken when you are down. I use a baking sheet lined with wax paper. Combine dry batter ingredients. Most important here, TASTE YOUR FLOUR! If it doesn't taste like anything, neither will your chicken. The main flavors you want to make sure you have are that of salt and garlic. If you can't taste the salt, add more until you do, mixing along the way. Once your flour tastes right, divide it evenly into two of the bowls. In the third bowl, combine the two cups of buttermilk and another tablespoon of hot sauce. The spice in the brine will be mellow at best, so this will help us kick it up! Place the buttermilk bowl in between the two flour bowls.
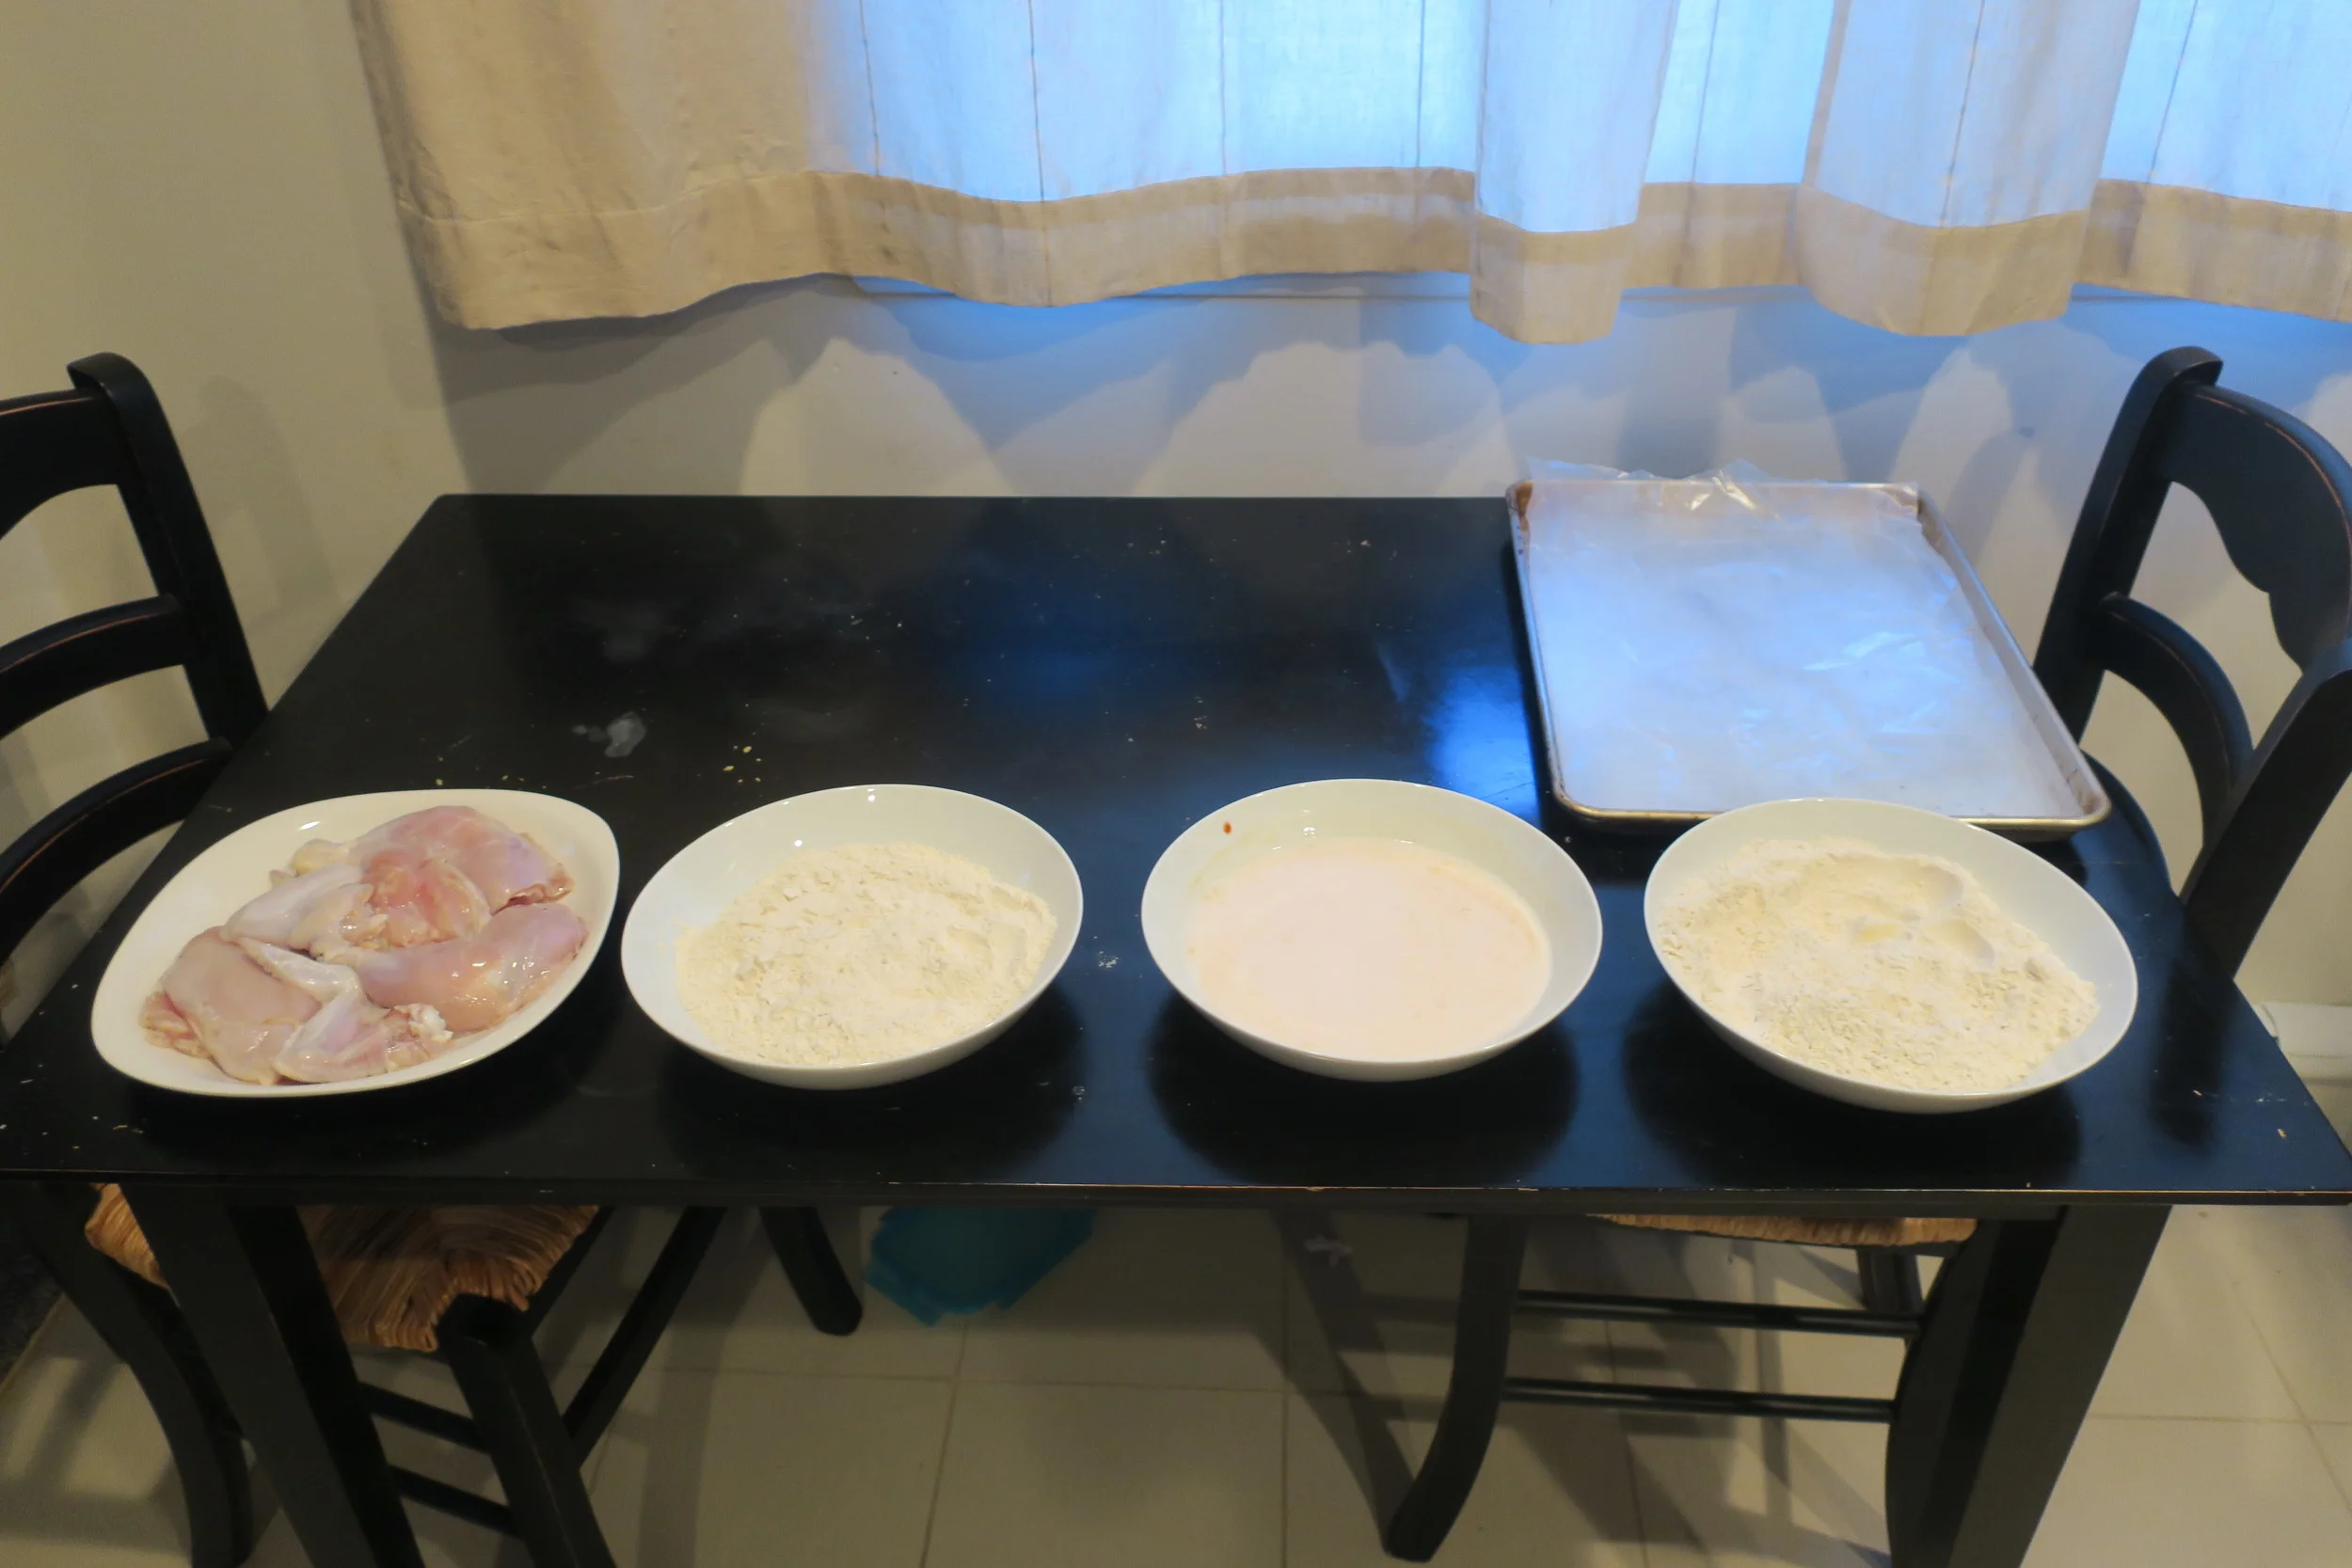
7) Heat the oil, bread that bird. Cover in flour, douse in buttermilk, then cover it in flour again. Don't shake any off! Let the chicken sit for at least five minutes. This will allow the batter get all goopy. If you want a little extra goop, add a dash buttermilk to the second flour bowl. Fill the pan so there's 3/4 of an inch of oil in the bottom, and flip on the heat. The oil is ready when it reaches 350°. Medium heat is good, here. It may take a few minutes. Be patient. If you're not careful, you'll fly right by, and the oil could start smoking; that means you screwed up and have to start over with new oil.
8) Preheat the oven to 350°. You might need it.
Now, pay attention. Frying can be a bit of an art. It took me a few times to get a feel for it. Don't be discouraged, keep at it. I have some tips to make the learning curve less painful.
Make a plan. Figure out how you want to arrange the chicken pieces before you start moving. Cast iron is great, but it produces hotspots. Meat over the burner will cook faster than meat to the sides. I put the thighs in the middle (directly over the heat), drumsticks and breasts on the outside. Sometimes that setup doesn't work. In this case, the legs and thighs were attached, so I improvised, but planned ahead of the drop. Any time you move the chicken around you risk the fry coming off, especially early on, say, right after you put in your first two pieces and realize you can't fit the others. So, you move things around. Tisk, tisk.
DON'T BURN IT. You can only fry for six minutes a side, max. If you're cooking at the right heat, and maybe less. My second batch, the breasts, were cooking so fast I had them on for, maybe at most, five minutes a side.
Oil temperature. This will drop when you put the chicken in the pan. I turn up the heat a little bit to make up for it. After a few minutes, adjust back down.
Juicy chicken. Meat gets juicy is because it's cooked to the right temperature. It has nothing to do with baking versus braising in liquid. This is why a meat thermometer is key. You'll also notice that just because the skin is perfect, that doesn't mean the meat is too. And trust me, prefect chicken with a small hole in the the crust is way batter than dry, or even undercooked chicken. Salmonella, yikes! At the thickest part, dark meat should read 160°, and white meat, 165°. I don't bother to check wings. Those are small enough that should be an issue. If it's not cooked after frying, stick it in your waiting oven and get the meat to the desired heat.
9) Fry em' baby. Remember, six minutes a side and check the oil heat if you are unsure. I typically get readings around 320° when the pieces are in, anything higher and I notice my breading can't last the whole six minutes. Be mindful of hotspots. As you get better, you can start to tell if you're cooking the outside too much. Call me crazy, but I think its the bubbles and the sound that tips me off.

10) If needed, finish in the oven. Remember, 160° for dark, 165° for white. The meat will continue cooking for a few minutes after it's out of the oven. I wait until I see at least those numbers before I pull it. The bigger the chicken, the more time it needs. Test for the temperature in the middle of the thickest part of the piece. One last thing, once the chicken is out of the oil, it should be sitting on a wire rack until ready to serve, during both cooling and baking. This will make sure it stays crispy. Uncrispy fried chicken is just plain awful, so don't put it in a bowl until it's cool and ready to serve.
11) Let sit for 10 minutes to cool. Place chicken on a wire cooling rack with baking sheet underneath to catch the excess oil. Air flow around the chicken is what you want. This is the hardest part, but way better than burning your mouth. I've let chicken sit for longer than this and it's still hot. Don't worry!
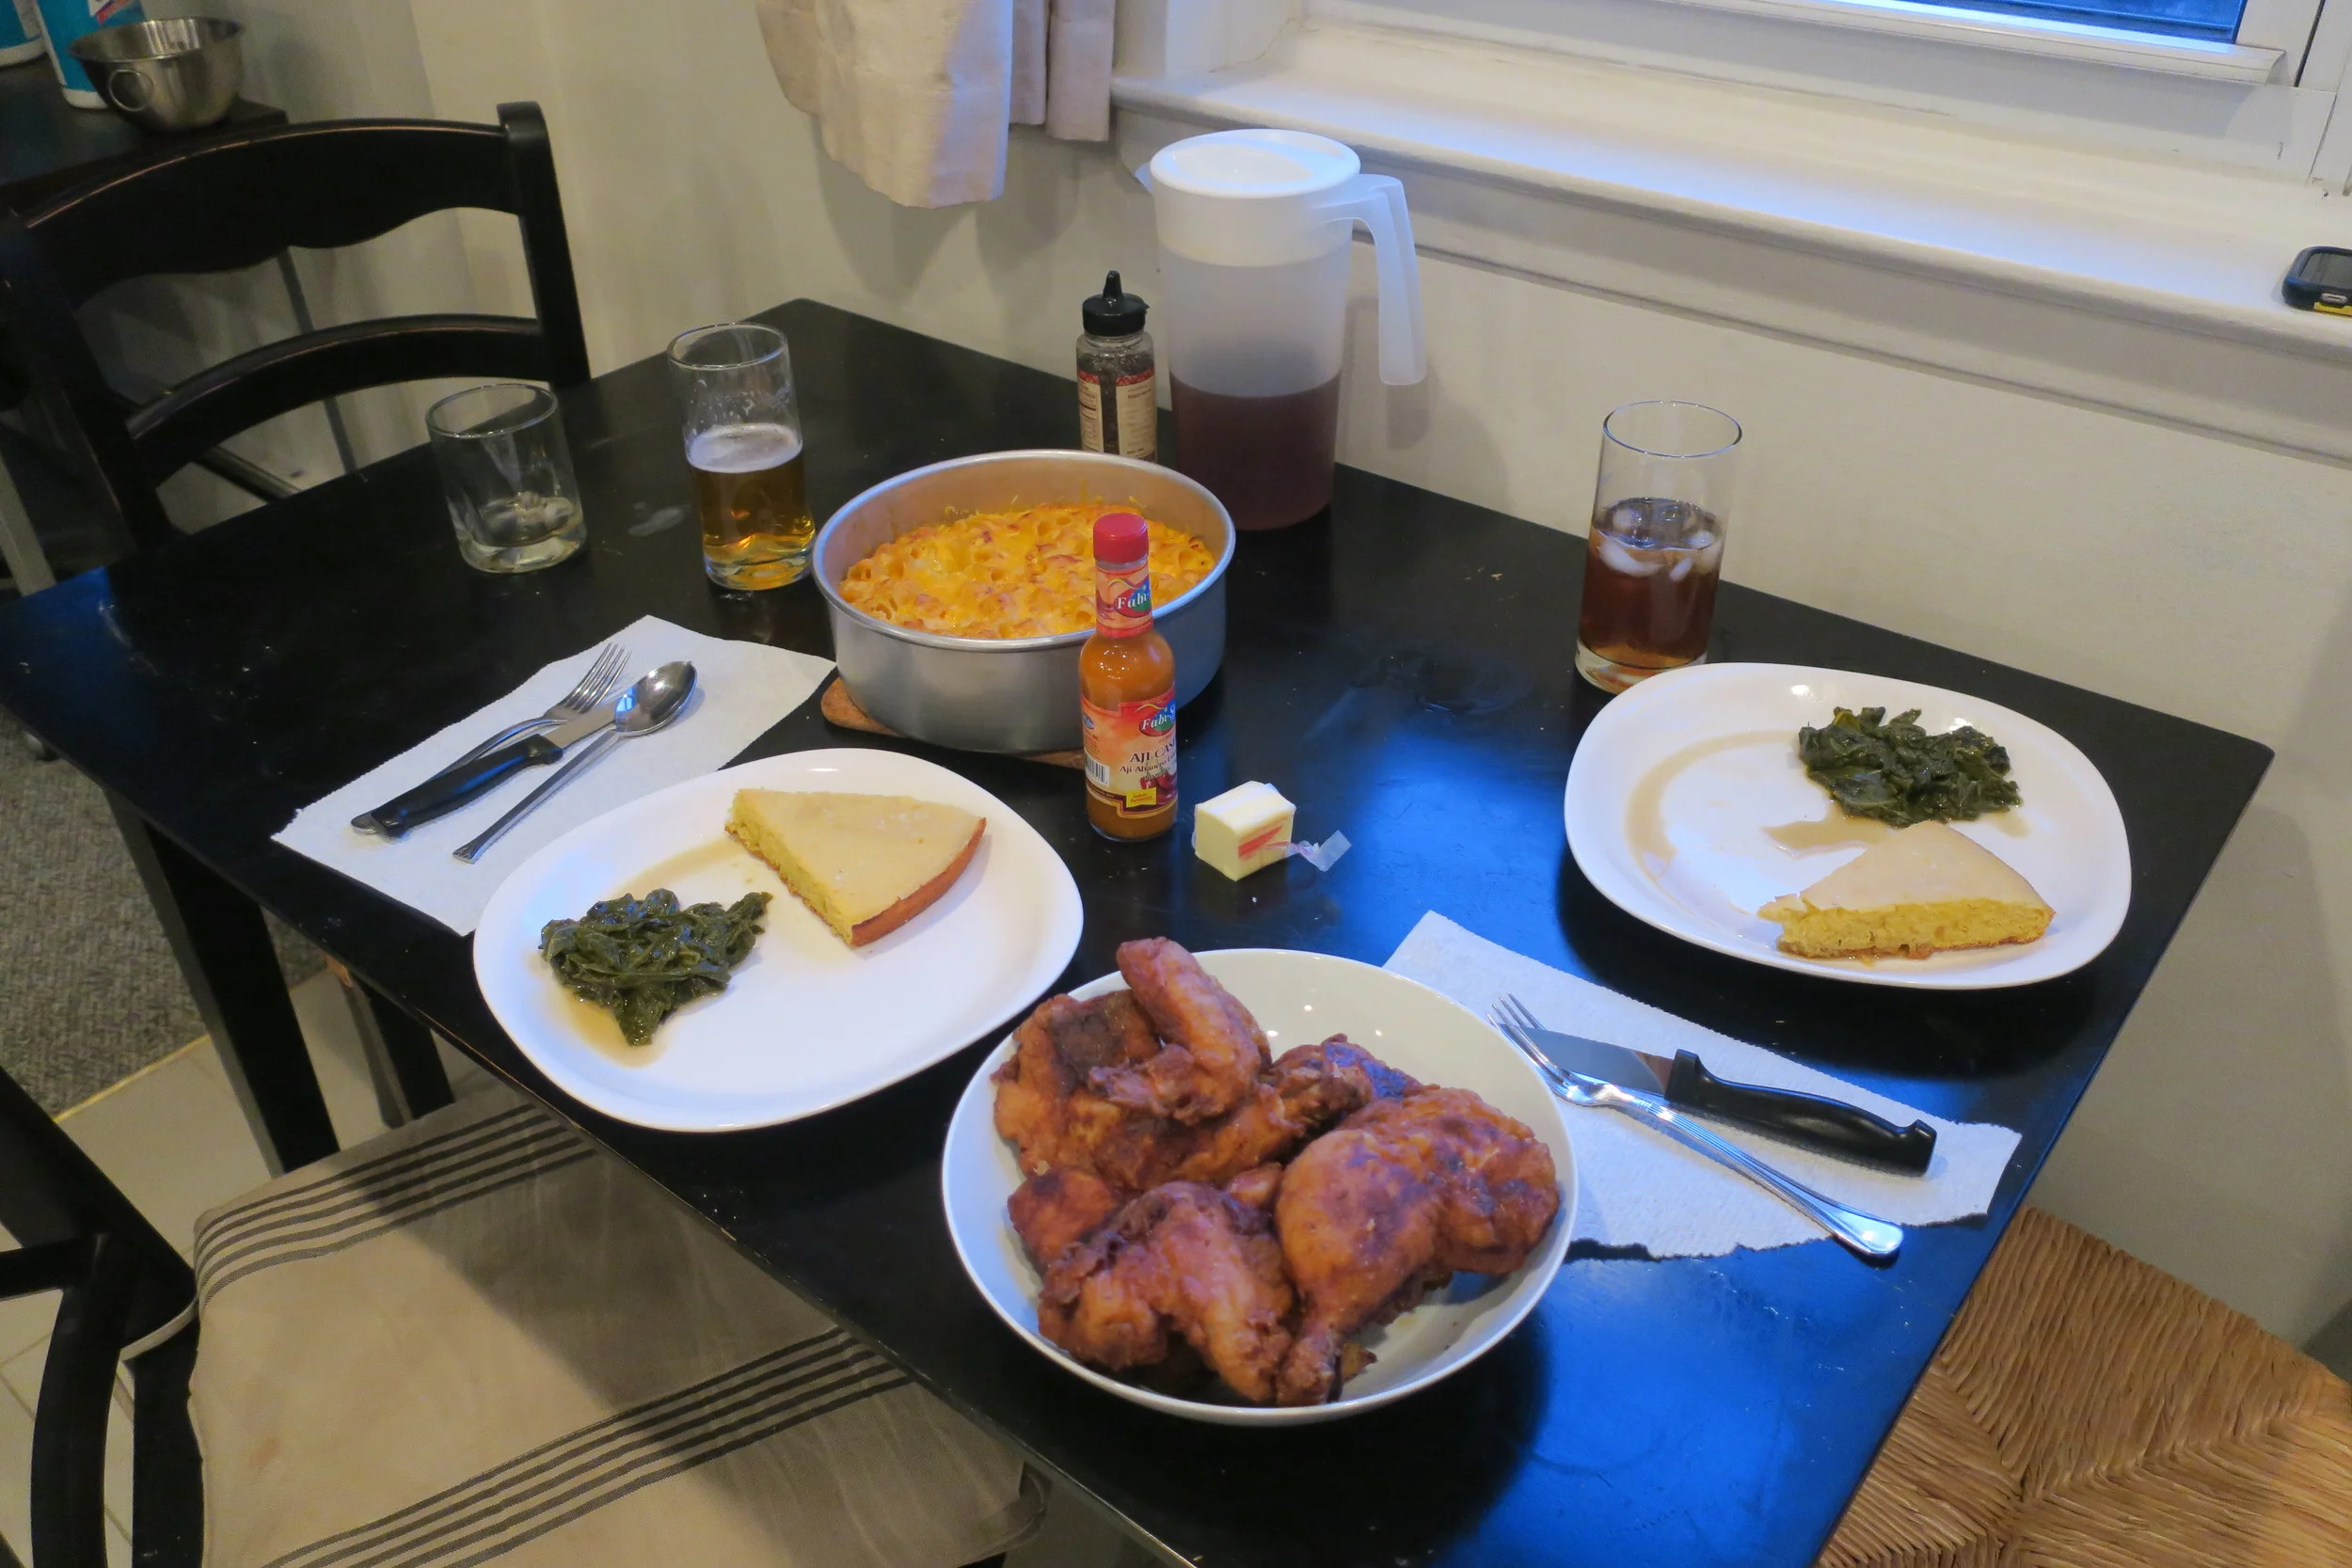
12) Get your sweet tea and sides ready, and stuff yourself silly!
Nothing sexy here, but one of my favorites. I definitely started making this because of Disney's Ratatouille! I love cooking "peasant" dishes, so after that line, I was sold. A great summer dish, it shines when all your veggies are in season.
There are loads of recipes out there—many of which I've tried—all calling for different cooking styles. This is the method I've settled on. It incorporates my rules of cooking and coincides with tips I received from the proprietor of a take-out French chicken joint I frequent. At Chicken Provence, Sandrine serves ratatouille over brown rice with roast chicken and spoonful of harissa. Her method, brown everything, and use only fresh tomatoes in summer and canned tomatoes in winter. I couldn't agree more.

Fresh Vegetables, and GREAT TOMATOES: Although I don't have a garden, I live in a part of NYC where I have access to a fabulous veggie stand that gets awesome local produce from Long Island. With at least 10 different tomatoes options, among other things, selection can be a bit confusing. Luckily, I struck up a conversation with the owner while she was restocking tomatoes. Asking which were the ones to buy, she went in the back and pulled out a fresh box. Picked that afternoon and just arrived! Sandrine would be proud.
1) Cut up your veggies. Onions and peppers into to 1-inch strips; eggplant and zucchini 1-inch slices, 1/4-inch thick; tomatoes, cored and 1-inch diced.

2) Coat a dutch oven with the olive oil, and on low-med heat, sauté the garlic.
3) Add the onions and peppers to the pot and turn up the heat to medium. We need to brown things and that can't happen until we cook the water out. Sprinkle in a healthy pinch of salt, and season with brown pepper. Stir and brown those onions! We are going to brown EVERYTHING. It might take more than 20 minutes to do this. I don't really understand why most recipes only call for a sauté time of 5 mins. If you want your food to taste good, you need to brown your veggies to release maximum flavor. Take your time, it will pay off.
4) Meanwhile, preheat the over to 375°. Like I said, we're gonna brown EVERYTHING. Toss the zucchini and eggplant in olive oil, a pinch of salt, and a few cranks of black pepper. Scatter onto a baking sheet. When the oven is ready, throw them in. It should take 20 mins, you just want things to get browned, both veggies will continue to cook later when we add them to the dutch oven.

5) When the onions and peppers are browned, not transparent, add in the tomatoes. Adjust the heat to medium-low and caramelize. And add salt! I tossed in a small handful. The reason we keep adding salt is because, honestly, that's what makes food tastes great. Hate to break it to you, but that's the cold honest truth. And sorry I don't give exact quantities, I eyeball it, then taste along the way to make minor adjustments. I like to think of cooking being more of an art, not a science. It more relaxing that way! The more you cook, the better you'll get at knowing how much salt to add. In this case I just say add a lot of salt because we working with tomatoes and we need to balance the flavor. The amount of salt you really need to use might be jarring for someone not used to seeing that much go into something. My mom always has to walk away when I cook, but, in the end, you will crush it at serving time.
This should go on for about 10-15 mins.
6) Now the tomatoes should be breaking down, add in the brown zucchini and eggplant, thyme, parsley, and basil. Stir it good, and pop the lid on and let it stew for 30-40 mins. And keep tasting for seasoning! You might need salt; I had to add pepper at one point, I was totally set on salt, so keep that in mind.
7) Serve up summer goodness! I like it best over brown rice, quarter of a roasted chicken, and spiced up with a dollop of harissa!

Pasta is my favorite food. This is the granddaddy of 'em all, the single most important recipe to my personal identity, the meaning of life itself. I'm not a fan of food blogs that have long stories which, frankly, aren't very compelling. But this dish makes up the very fiber of my being, and if I don't write about this, there's no point in posting anything at all. It won't happen again. I promise.
When I was a freshman in college I went to Italy to visit family. We were an inter-generational cadre, accompanying my great uncle on his final trip to our ancestral homeland. One night, in Rome, sitting in a street car on Via Veneto decorated in white Christmas lights, I ordered my first bowl of Amatriciana. When the sauce made contact with my mouth, the heavens opened. A light shone down and a choir of Gregorian monks began to sing. From that point on, pasta would never be the same. I returned to Rome three years later to study abroad.
In the time between my first trip to Italy and when I boarded a plane to go abroad, I learned to cook. My godfather taught me how to make his mom's sauce and legendary meatballs. They were so legit, she used to give them away at family gatherings, stacks of egg cartoons, each with a dozen meatballs inside, sauce spilling out over the edges. I developed a reputation as the cook in my fraternity. I'd make sauce in huge pots, and with the help of others, oversee a meatball assembly line designed to feed 80 people. It was with this experience that I returned to Rome. Ready to conquer amatriciana.

A local specialty, it was on every menu. Anytime we ate out, I ordered amatriciana, on the look out for the best in town. Finally, in a back alley in the Medieval section west of the Piazza Navona, I found it. Dangerously convenient, Il Fico on Via Monte Giordano was a temple. Tucked away in narrow, winding cobblestone streets, amidst buildings haphazardly constructed in the Middle Ages, it was a refuge from the pure insanity of Rome. Getting lost in the Medieval thicket was no difficult task–even for a local.
At first, I was going once a week, then, twice. By the end of my stay, my days numbered, I could be found eating lunch on four different days! Most often I'd go by myself as no one else could match my religious devotion. Fernando, my waiter, would always put something on the house. Wine, dessert, appetizers, all were in rotation. When I wasn't with the other pieces of furniture, I was in my apartment experimenting. Everyone will tell you; Italian food is all about ingredients. I had access to the best. Yet, trial after trial, I couldn't get it to taste like Il Fico's sauce. Finally, I asked Fernando.
In my stupidity, I listened carefully. What I should have done was march back to the kitchen and watch the cook prepare my order. Epic fail. I was practically paying the utility bill myself. I had every right to demand an audience with the chef! Thanks to that little mistake, I ended up occupying myself for six years, filled with one feudal attempt after another.
When I returned to the US, I started to have dreams about Il Fico's amatriciana. This is 100% true, and also, 100% pathetic. Never the same dream, I'd get them at least once a week. I'd be in Rome, wondering, lost, desiring above all else to see the doors of Il Fico, and to know I was back. At first, the situation would be dire, but the dream would always end with a neatly resolved plot and me strolling towards my place of worship. It's a dream, alright, they never make sense to begin with. As time went on, they became less frequent, and more desperate. I'd find the trattoria, but it would look different. I'd order my favorite dish, and to my horror, they'd be out, or worse, it tasted nothing like it once did!
And now, with a strong suspicion that I was crazy, we come to the present day. I moved to NYC after college and the single most important ingredient in amatriciana, guanciale, was at my disposal. Thus began years and years of tiny iterations, proving without doubt that I am, in fact, a lunatic. My roommates have eaten so much of this over the years, it's become a joke around the apartment. The remarkable thing about this, there are literally three ingredients, not including pasta.
Maybe I was chasing something that wasn't. Maybe I've forgotten what it actually tasted like. Maybe, I conjured an image of intangible perfection, one impossible to achieve. Just like that incredible lover of your dreams, that seems to always elude you. Just like that, except I'm taking about a pasta sauce. Yikes. But alas, my obsession was vindicated. I found what I had lost. Be it never lost again!
Named for the town of Amatrice in Lazio, the province that surrounds Rome, the original dish didn't have tomatoes. They were only added in after Columbus' discovery of the New World, where they originated. Once in Europe, they were a hit. Apart from the Beatles, it's safe to say this was the most loved import of all time. Can you even comprehend the idea of Italian cuisine existing without tomatoes? A dark and troubling thought, indeed.


Guanciale: This is the keystone. It's pig jowl, it's fatty, and it's so, so beautiful. I can feel a tear running down my cheek just thinking about it. Some people will substitute in pancietta, and those people are nuts. No guanciale, no Amatricana. If you want to get really nitpicky, like some of us do, the type of guanciale can matter. The type I like to use is rubbed in a black pepper.
Mezze Maniche: Believe it or not I'm weirdly OCD about a few things. Shocking, I know. One these things is pasta shape. Growing up my dad loved perciatelli and I hated them. It felt like I was eating worms. In Rome, bucatini all'amatriciana is all the rage, and that doesn't still well with me. Bucatini is very similar to perciatelli and I don't play that game. At Il Fico, I'd order "pasta corta" (short pasta). They used Mezze Maniche. I really like the shape, texture, and the way sauce and crispy bits of guanciale get lodged inside. It's the best little surprise you'll ever get. It's not easy to find outside of Italy, so mezzi rigatoni is a good substitute.
San Marzano Tomatoes: Must have. Bright, bold, and beautiful, just how I like my women. They need a ton of salt to balance the flavor but are simply the best. Don't comprise.
Also, use a food mill. It leaves behind the seeds and skins, producing a tomato puree of uniform consistency. This makes cooking down the sauce not only possible but a dream. If you don't mill it, you'll get this weird mix of watery fluid and solids. I'm all about flavor concentration and there's not much you can do if you're working with a substance you can't properly cook down.
Salt: Salt salt salt, salt, salt salt. Use it.
Black Pepper: This is what Fernando told me that was different about Il Fico's sauce. HIGHLY unorthodox. However, if you want to stand out, you need to take risks.
Onions: Never red.
Pecorino Romano (Sheep's milk Romano): In general, Italians use, pecorino romano with red sauces, parmigiano in other instances. It comes from sheep's milk not cow's, and is a storied tradition in Roman cuisine. You might be thinking, "Hey Ben, what about chicken parm?". Well that isn't actually an Italian dish. It's Italian American. Just like the cast of Jersey Shore, not actually Italian, just annoying.
Also on that list of Not-Actually-Italian, meatballs, Alfredo sauce, and garlic bread. I don't pass judgement on any of these except for Alfredo sauce, I really dislike that stuff. Eggplant parm is a thing but its more like eggplant lasagna, using the sliced vegetable as the sheets of noodles. It's loaded with cheese and freaking great, as is everything loaded with cheese.
Garlic: Funny story about this one. I was actually asked about this in an interview. On my resume, I listed that I liked cooking. My interviewer asked...
"What's your my favorite dish?"
Me: "Pasta all'amatriciana."
"Garlic or no garlic?"
Me: "How do you know about this!?"
I don't use garlic, but unlike pepper, this is a hotly contested ingredient, with experts lining up on both sides of the aisle. This was a very sophisticated question, not one that would be asked by the casual, or even serious Italian food enthusiast, hence my surprise. I got the job, and this story continually came up more times than I could count.
Finally...
1) Coat a sauce pan with olive oil, on low, and render the lardons until they are browned. Take your time! Low and slow gets the fat into the pan. Too hot and you hit the smoke point. You do that, you get bitter sauce. Just don't. Low and slow. It could take 20-25 mins, maybe more!
How do you know you screwed up? What you don't want to hear, see, and smell, is sizzling, smoke, and smoke. If you experience these, your sauce is ruined. Clean the pan and start over.
Another problem with a high, searing the meat. This traps the fat, and we want to extract as much as we can! FYI, this cut makes bacon look lean. Liquid fat should be pooling in the bottom of the pan. You won't be removing any on it. Keep calm and carry on...


2) Once rendered, remove the guanciale, and hold to the side. Add the onions, throw in a dash of salt, and cook low and slow until caramelized. This will take 20 min or more. Don't rush it. And remember, if you cook the fat at too high a temp, you're gonna have a bad time.
**Note: The onions are cooking in a pool of fat. Deep breaths, everything will be fine. You're right on track to absolutely crushing it in the kitchen, and becoming a legend. Stay the course.
3) Run the tomatoes through a food mill. You're left with a consistent, uniform tomato puree. If you don't use a mill, you get tomato water with chunks. Not good. I'm also OCD about sauce constancy. I strongly believe that for cooking, and just taste in general, this contraption makes a huge difference.

4) Add the tomato puree and reserved guanciale to the onions. Bring to a boil, once there, reduce to a simmer. Add salt and a few cranks of the pepper from the grinder. Keep tasting as it cooks, you will need to add decent amount of salt. Do it in stages so you don't overdo it. But be warned, if you're not used to cooking with San Marzano you might be a little shocked just how much you end up adding. I'm not sure exactly how much I use, but I'd ballpark it around three hefty pinches. Cook for 45 min.
This is might take a few times to get the hang of, especially if you're new to cooking, or were taught to under-salt things. Rely on taste.

4) Boil the water in a separate pot. It should be very well salted, tasting like the ocean, but not so salty you can't sip it. If you don't salt enough, your pasta will taste like nothing. Not good. You've spent so much time getting to this point. Don't mess it up.
5) Cook the pasta until its almost al dente, drain it using a colander.
6) Place pasta pot back on the stove and ladle sauce back in the pot. Turn heat on low.
7) Return pasta to the pot from whence it came, letting it simmer with the sauce. Finish cooking the pasta, infusing it with deliciousness. 2 min.
8) It's time. Apply cheese and eat yourself silly.
9) SCARPETTA. This step MUST not be skipped. It's the all important act of using bread to wipe your plate clean of remaining sauce.
Namaste friends, namaste...


